
MIDI Keyboard video to Music Sheet
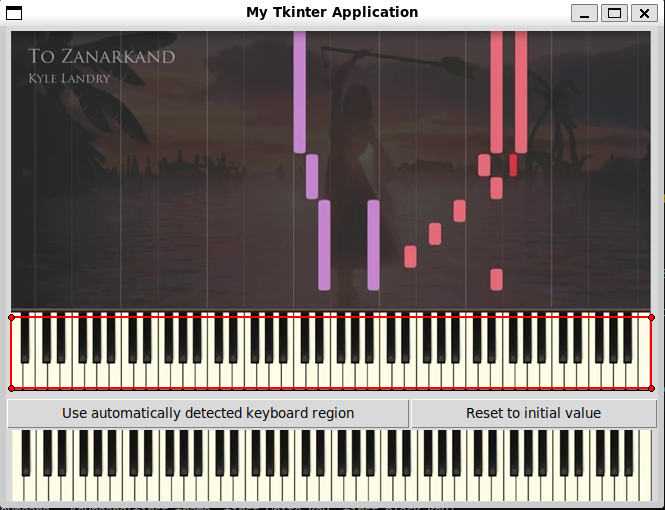
Synthesia videos display a virtual keyboard with colored bars falling onto the keys to visually guide players through a song—like a playable piano version of Guitar Hero. We can find a lot of them on YouTube – a few examples: Joe Hisaishi - Fantasia (for Nausicaä) - Piano Tutorial, FFX - To Zanarkand [Piano Tutorial] (Synthesia) // Kyle Landry, The Aristocats - Scales and Arpeggios.
These videos are a great way to learn a song, but most pianists I've spoken to say they often prefer using a traditional music sheet—something that's not always easy to find. That's why I decided to create a program that takes a Synthesia-style video as input and generates a music sheet as output.
Technologies & Design Choices
This project was an opportunity for me to refresh my knowledge of OpenCV, which I had previously used during my studies. I chose Python over C++ to speed up development, as performance optimization wasn't a key concern for this tool.
My goal wasn't to build a polished, downloadable app for the general public, but rather a tool that Python enthusiasts could try out. As such, I didn't invest much time in developing a sophisticated graphical user interface (GUI). OpenCV alone wasn't sufficient for my needs, so I opted for Tkinter over Qt due to its simplicity.
I used traditional computer vision (CV) techniques—along with a bit of clustering—rather than deep learning, since collecting and annotating enough data to train a robust model would have been a challenge. Following Occam's Razor, I favored the simplest and most interpretable method.
The code is structured using object-oriented programming (OOP) principles. The GUI is decoupled from the underlying logic, which makes it easy to modify or replace either component without impacting the other.
How It Works
The overall approach is based on a few assumptions:
- The keyboard remains static throughout the video and isn't overlapped by any objects.
- The lighting or appearance of unpressed keys remains consistent.
Based on these assumptions, the program analyzes the video frame-by-frame and compares each key region to a “clean” reference frame (captured when no keys are pressed). When a region significantly differs from the clean frame, it's marked as a pressed key. Each note's duration is estimated by counting how many consecutive frames it appears in. Finally, all notes and durations are compiled into a music sheet.
1. Detecting the Keyboard Region
Most Synthesia-style videos show the keyboard at the bottom of the screen. To identify the top of the keyboard, I use the Hough Transform technique to detect the highest horizontal line in the frame. This serves as the boundary for the keyboard region.
To ensure flexibility, the user can manually adjust the detected region if it's inaccurate.
2. Detecting Keys and Notes
Assuming the keys are aligned straight, different strategies are applied for black and white keys:
- Black keys: OpenCV's connected components labeling (based on the Spaghetti algorithm) is used to identify individual black keys. Before that, I erode the thresholded image to remove thin vertical lines, then dilate it back. Sorting detected regions by x-coordinate gives us the left-to-right key order.
- White keys: It is easier to focus on the region below the black keys, that is found by detecting the bottom edge of the black keys. We then detect vertical lines in the bottom part, and identify white keys as the regions in between. This only works when the lines are perfectly vertical—videos with angled keys (like this one) are not handled by this method.
Assigning notes is done by identifying two consecutive white keys patterns and inferring the rest of the layout from that anchor point. In case the keyboard is not entirely shown on the screen, I assumed that the 4th octave is in the middle of the keyboard.


3. Identifying Pressed Keys
For each frame, we go through each detected key and compare its region of interest to the clean reference frame. Minor pixel differences are ignored to reduce noise. If significant changes cover more than a threshold percentage of the region, the key is marked as pressed. Note that for that part, the keyboard is divided in two parts to better isolate white and black keys.
The thresholds were empirically set: 20% for white keys and 40% for black keys. I also provide an interface that allows users to adjust these thresholds and see how detection sensitivity is affected.


4. Converting pressed keys to meaningful notes
Handling rhythm
Since note durations can vary slightly for notes of the same rhythm (e.g., two quarter notes with a tiny different number active frames), I use k-means clustering to "denoise" the number of active frames.
To then reconstruct the music sheet, we need:
- The frame where a note begins (to determine its beat position)
- The number of frames it remains pressed (to determine duration)
By combining this with the video's frame rate (FPS) and the tempo in beats per minute (BPM), both the timing and duration of each note can be inferred with the formula:
beats per frame = BPM / (FPS x 60)
For now, we are missing the BPM part. The BPM represents the number of quarter notes per minute. Assuming the music piece contains at least one quarter note, one of the centroids will represent the number of active frame associated to them. The user is, therefore, asked to choose a tempo from a list of precomputed BPMs (obtained from the cluster centroids) with the formula:
possibleBPM[i] = (FPS * 60) / nb_active_frame_centroid[i]
The list only serves as a reference, and the user can always enter another BPM manually.
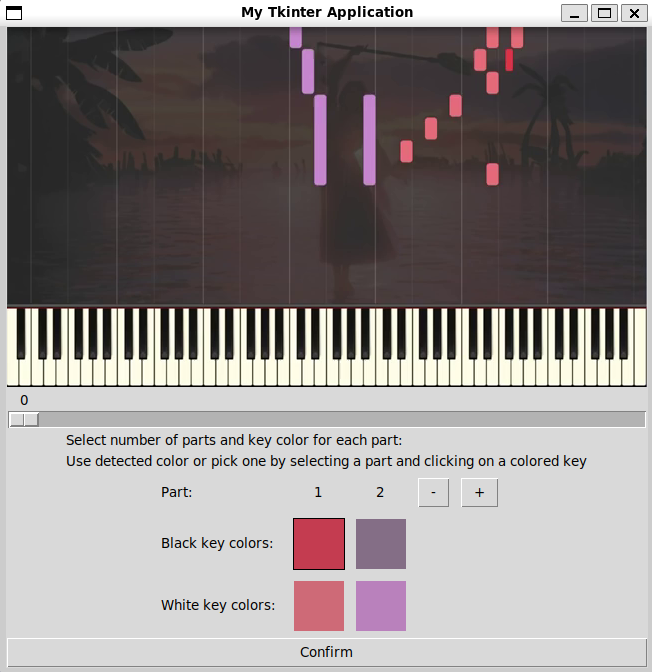
Identifying left and right hands parts
In most Synthesia videos, each hand is shown in a different color. On a music sheet, right and left hands are written on separate staves. To capture this, I store the average color of each pressed key across the video. Once all frames are processed, I apply k-means clustering to group the colors and identify the different parts (can range from 1 to 4 hands). The user can manually reorganize the detected parts as needed. The different parts will be put on a different stave in the final music sheet.
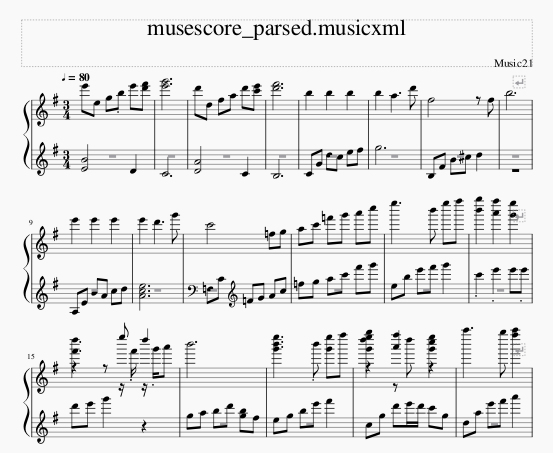
5. Exporting to MusicXML
Using the Music21 library, I compile all the detected notes, rhythms, and parts into a MusicXML or MIDI file. This file can be opened and modified in a software like Musescore.
Limitations & Future Work
Some known limitations and areas for improvement include:
- The detection relies on keys lighting up, so it doesn't work if hands cover the keyboard.
- It only works with a perfectly static keyboard with straight key separations.
- Sensitivity thresholds must currently be set manually. Even though it works for most videos I tested the tool on, future work could focus on automating that part.
- Only binary time signatures are supported for now (e.g., 2/4, 4/4); ternary rhythms like 6/8 are not yet handled.